Setup Magento 2 on Docker with elasticsearch in less than 2 mins!

I’m sure you’ll agree that Magento is a very resource heavy software and requires a stable setup to run it smoothly. We’ve all been in a situation where we’ve complained how slow the Magento system is to run locally but what if I told you there is a docker setup for Magento which is ready to use and only requires one command to have your environment ready? Yes only command!

In my early days as a Magento developer, I’d marry with a fact that we should never rely on a local WAMP/XAMP setup to run Magento and I was introduced to Docker but that being said, there were so many Magento instances to choose from. Some required custom integrations/plugins and some were not good enough to use.

I then stumbled upon a ready-to-use Docker cloundpanel instance which was purely focused on providing developers with a stable Magento development setup in one step, and the step was to install the Docker image locally and viola you have a cloudpanel quite similar to CPanel which allows us to create/list multiple development domains and it was packaged with Elasticsearch, MySQL and Varnish to support Magento.

The Docker instance I’m referring to is create by MGT-Commerce which is a Magento cloud hosting providers. I’ve detailed the steps below to install and setup a Magento development domain.

The MGT Docker image comes in all stable version of PHP starting from PHP 7.0 up to PHP 7.4. You can pick and choose the PHP image you need and even you can run multiple instances at the same time (just ensure each instance has a unique port).

Since Magento 2.4 is now our and ready to use so let’s setup a PHP 7.3 instance and install Magento.

First, we need to install the PHP 7.4 image and to do that, run the following command in your Docker CLI.

Install PHP 7.3 Docker Image

docker run -d --net=bridge -v /var/lib/mysql --restart=always --privileged -h mgt-dev-73 --name mgt-dev-73 -it -p 80:80 -p 443:443 -p 22:22 -p 3306:3306 -p 3333:3333 -p 9200:9200 mgtcommerce/mgt-development-environment-7.3

Once the image is installed, you can access it at http://127.0.0.1:3333/ and the panel should look similar to the following image:

Cloudpanel to setup development domains

Install Magento 2.4 on Docker

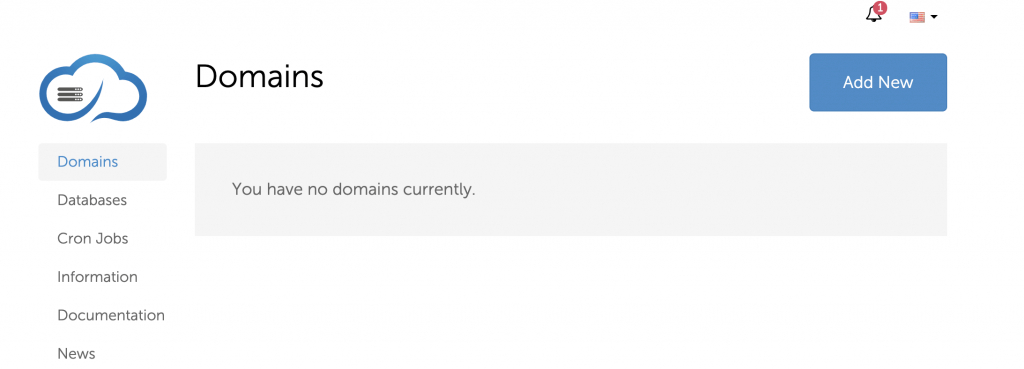
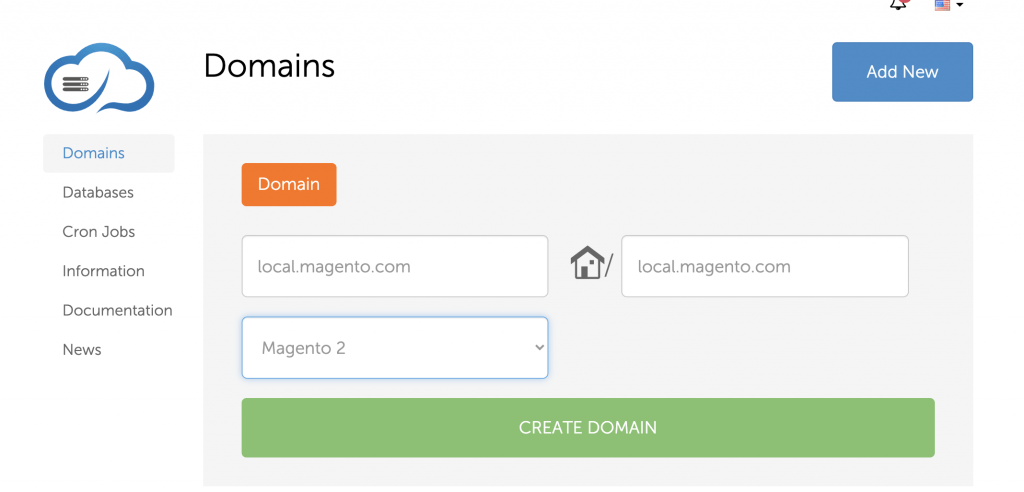
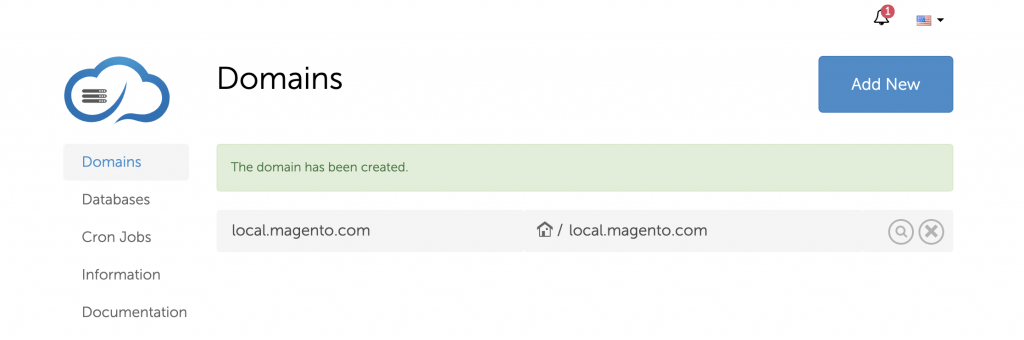
First, we need a domain to setup/install Magento 2. Simply click on Add New to create a domain space and click Create Domain.

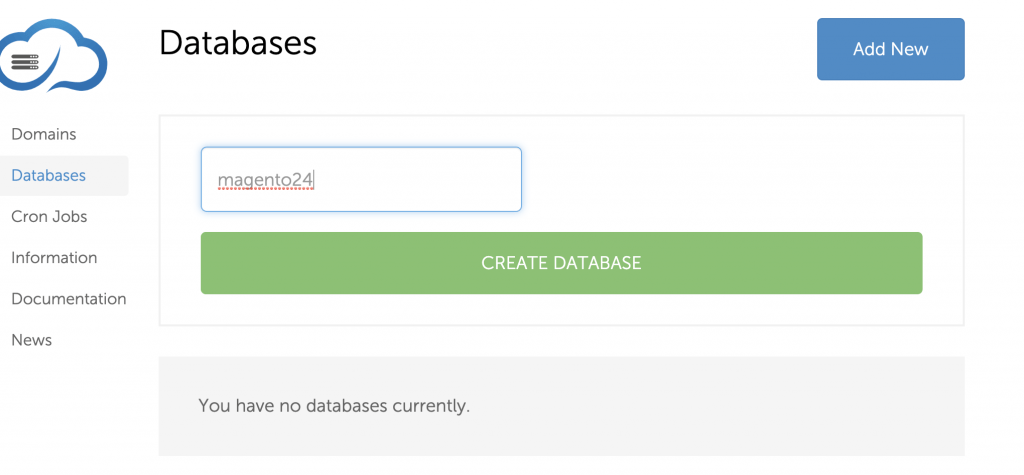
Next, we need to setup a MySQL database to install Magento so simply click on Databases from the left nav panel and click Add New.

Now, we should have a database ready to install Magento, a domain name and a web/disc space created in our Docker container to install Magento.

You can also access the website root via SFTP or SSH.

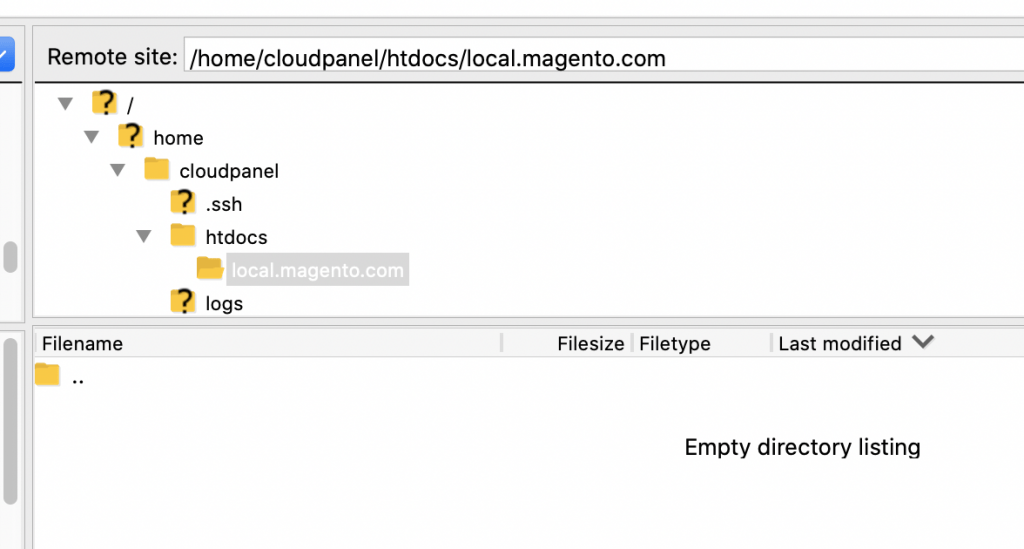
To connect, simply use the following:

FTP HOST: 127.0.0.1:22

USERNAME: root

PASSWORD: root

DOCUMENT ROOT: /home/cloudpanel/htdocs/local.magento.com

Finally, simply download the Magento 2.4 composer file or the whole package from their GIT repo and upload to the directory specified above. Once done, connect to the server using SSH and you can safe run the Magento installation commands to install Magento.

That’s all! No rocket science!

Do you have any questions or feedback? Please let me know in the comments!

Solved: Getting TypeError: $.widget is not a function Magento 2 and customers cannot checkout

Solved: Getting TypeError: $.widget is not a function Magento 2 and customers cannot checkout

Recently, one of our clients started to get $.widget is not a function JS error on their Magento 2 store and as a result, customers weren’t able to complete their checkout.

The error was present on Minicart, Product view page, and Checkout page and even changing to default Magento 2 template did not fix the issue.  Eventually, I found that the issue was with Magento JS merging and I was able to fix the issue by making the following changes:

Merge all javascript files:

In Backend go to:

Stores -> Configuration -> Advanced -> Developer -> JavaScript Settings

Activate:

  • Enable JavaScript Bundling
  • Merge JavaScript Files
  • Minify JavaScript Files (Optional)

Deploy the static files

bin/magento setup:static-content:deploy

Clear cache under System -> Cache Management

  • In Additional Cache Management region choose the Button Flush CSS/Javascript Cache
  • And Flush Magento Cache afterwards

Now clear Cache in Browser and reload. Everything should be back to normal now. 

Solved: Learn how to fix 500 Internal Server Error on Magento 2.2.2

Solved: Learn how to fix 500 Internal Server Error on Magento 2.2.2

I’ve used Magento v2.1.x for a while and then decided to give Magento v2.2.2 a try because why not, upgrading the tech stack is always good, isn’t it?

As usual, I opted in for CLI based installation and Magento was installed successfully, however, I was served a 500 Internal Server Error whenever I tried to access the website.

I’ve learnt from my experience is this error usually occurs when something is wrong with .htaccess file and that’s where I looked for this fix as well.

I removed .htaccess file and the site was back online, however, it still didn’t work properly. I then added the .htaccess file back and the error came up again.

I also looked at the server error log but there wasn’t much information available. Eventually, I decided to play around with apache modules and noticed that mod_version was disabled. I activated mod_version, restarted apache service and hello world, the site was back online.

So in a nutshell: 

  1. Check webserver modules – in my case, the problem was with mod_version as it was disabled. Enabling it fixed the issue.
  2. Enable/Disable your htaccess file to see if it resolves your issue
  3. Disable third-party extensions one by one to troubleshoot
  4. If the issue persists, visit the Magento community forums and post your issue there.  

Let me know if mod_version fixed your issue :)

Happy coding.

Solved: How to fix Magento 2 Plugin class Vendor\ModuleName\Plugin doesn’t exist?

Solved: How to fix Magento 2 Plugin class Vendor\ModuleName\Plugin doesn’t exist?

Magento is a complex system and it is important to pay close attention to what you code.

One of my clients had a special requirement in which I had to customise the customer login controller to meet the business needs.

One option was to create a custom controller and add a preference in di.xml, and the other option was to write a Magento Plugin. I opted in for the later option.

Everything worked fine on my local and the plugin worked as expected but when it was deployed on the test server, it did not work and returned the following error:

Plugin class Vendor\ModuleName\Plugin doesn't exist

I tried Google, StackOverFlow, Magento community forums and every single website but did not find a solution at all. Eventually, I decided to reiterate the local installation steps to the test server and noticed that on my local I hadn’t used Composer to deploy the package whereas on the test server, the package was deployed using composer.

It was good head start and then I knew the issue is with composer file. After reviewing the file, I found out that everything in the file was fine except the missing PSR-4 element.

Before the fix, my composer was:

 "autoload": {
 "files": [
 "registration.php"
 ]
 }

and after the change:

 "autoload": {
 "psr-4": {
 "Vendor\\ModuleName\\": ""
 },
 "files": [
 "registration.php"
 ]
 }

I saved the file, ran composer and the plugin worked as expected. The error was no longer there.

Summary

  1. Although every problem is different but it is always important to start with simple fixes. Review the directory structure, your di.xml and config files.
  2. Ensure that you follow the same process as you did on your local i.e. Make sure that the deployment process is same as your local.
  3. Check your composer file and ensure that there is no missing information

Solved: How to Remove SID (SESSION_ID) from URL in Magento 2?

Solved: How to Remove SID (SESSION_ID) from URL in Magento 2?

The SID is a “session ID”. Magento uses this to track a user’s activity within the same Magento installation. Normally, Magento powers one website and one store from one installation (database).

Magento could power multiple websites with multiple stores from one installation though. The SID allows users to stay logged in while navigating across these websites/stores.

I think if you have the function enabled, the SID is sent when accessing catalog URLs so Magento can update the session with the user’s location/state for the current website/store.

If you’re not running a multi-website or multi-store environment, it’s safe to disable the SID on the frontend.

To disable SID from the storefront go to:

  1. Magento dashboard > Store > Configuration > General > Web > Session Validation Settings > Use SID on Storefrontand set its value to No.
  2. Re-index Magento
  3. Refresh Magento cache


If the SID is still present in the URL then the next step is to make server level change in your root htaccess file:

The solution is simple. Go to your .htaccess fine and find the line that says

RewriteEngine on 

If you want to have www part:

RewriteEngine on 
RewriteCond %{HTTP_HOST} !^www\.yourdomain\.com$ [NC]
RewriteRule ^(.*)$ http://www.yourdomain.com/$1 [R=301,L]

If you don’t want to have www part:

RewriteEngine on 
RewriteCond %{HTTP_HOST} !^yourdomain\.com$ [NC]
RewriteRule ^(.*)$ http://yourdomain.com/$1 [R=301,L]

Do you know a better solution? Leave a comment and let me know.