by Shoaib Rehman | May 10, 2017 | Magento, Magento 2, Web development

Why does this happen?
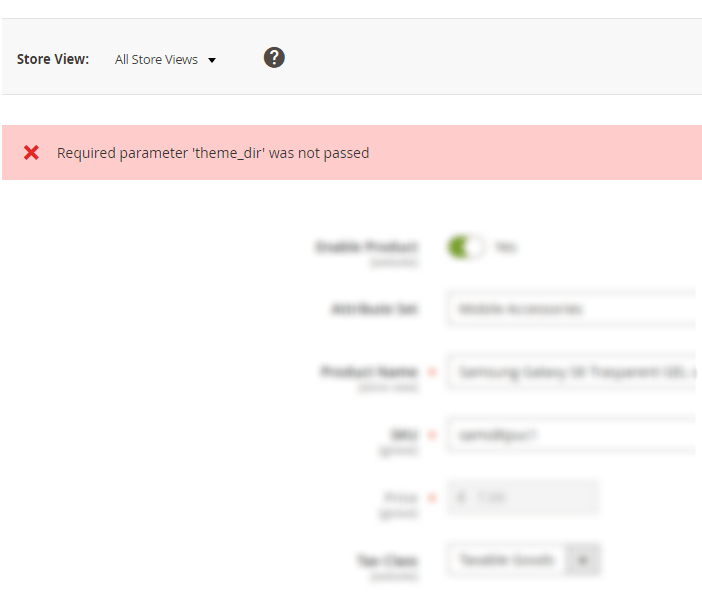
This error is normally returned when you remove your Magento theme directly from app/design or vendor/ directory. Removing theme files directly from the directory is not a Magento standard way anymore. Magento 2 has a CLI command to remove themes safely i.e.
Command usage:
magento theme:uninstall [--backup-code] [-c|--clear-static-content] {theme path} ... {theme path}
{theme path} is the relative path to the theme, starting with the area name. For example, the path to the Blank theme supplied with Magento 2 is frontend/Magento/blank.--backup-code backs up the Magento 2 codebase as discussed in the paragraphs that follow.--clear-static-content cleans generated static view files, which is necessary to cause static view files to display properly.
Solution
STEP 1 : File Operations
- Delete the content from
app/design/frontend/<Vendor>.
- Delete all the content of folder
var/view_preprocessed & pub/static/frontend.
STEP 2 : DB Operations
Go to your theme table and delete the entry for your created theme.
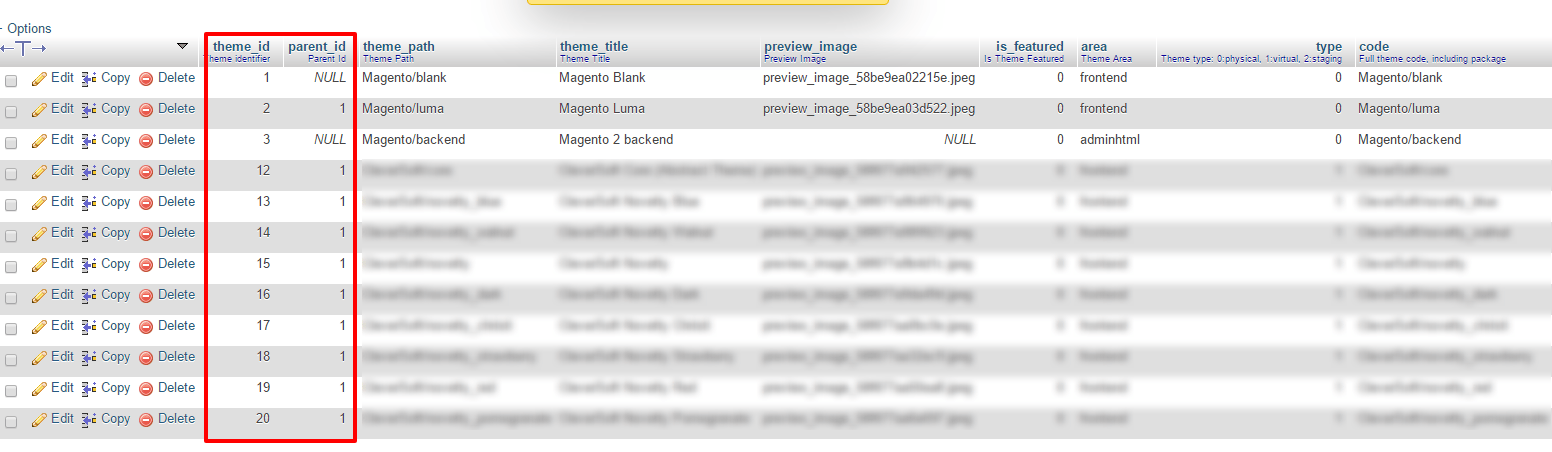
After that…
Go to your core_config_data table and search for theme and you will get path records like design/theme/theme_id replace your default theme id in it. You can run the following command in PHPMyadmin or your database CLI.
SELECT * FROM `core_config_data` WHERE `path` LIKE '%design/theme/theme_id%'
STEP 3 : Flush cache
Flush your cache php bin/magento cache:flush
by Shoaib Rehman | Apr 21, 2017 | Magento 2, Web development
Steps to reproduce
- Put store in maitenance mode
- Install Magento 2.1 either from CLI or zip upload
- run setup:upgrade and setup:di:compile commands
- Navigate to front end
Expected result
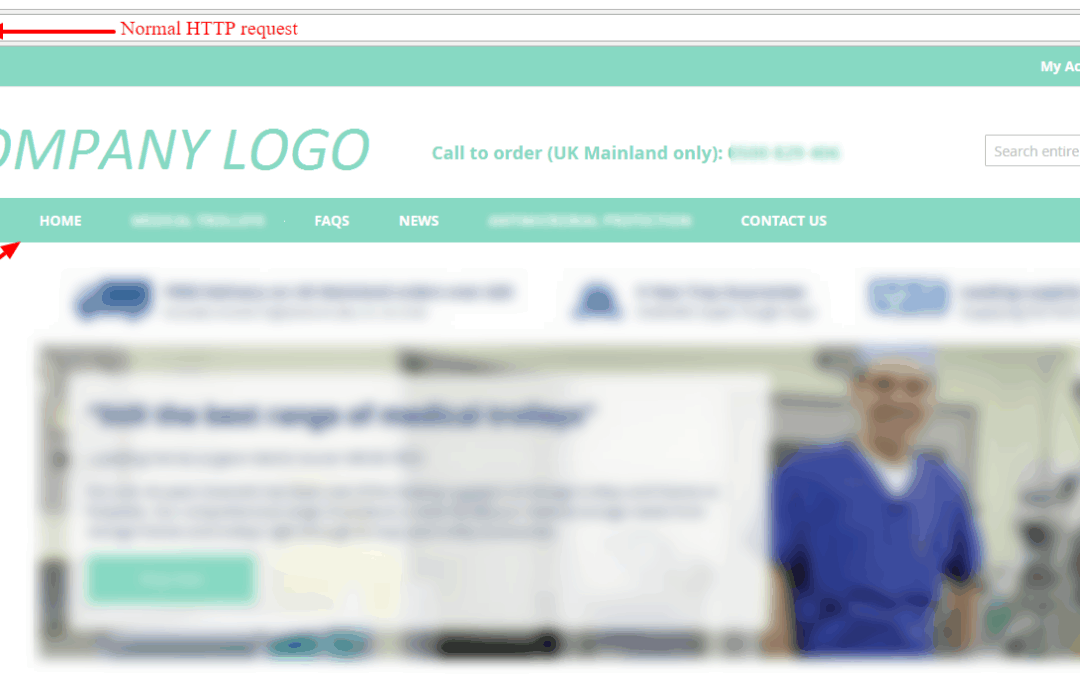
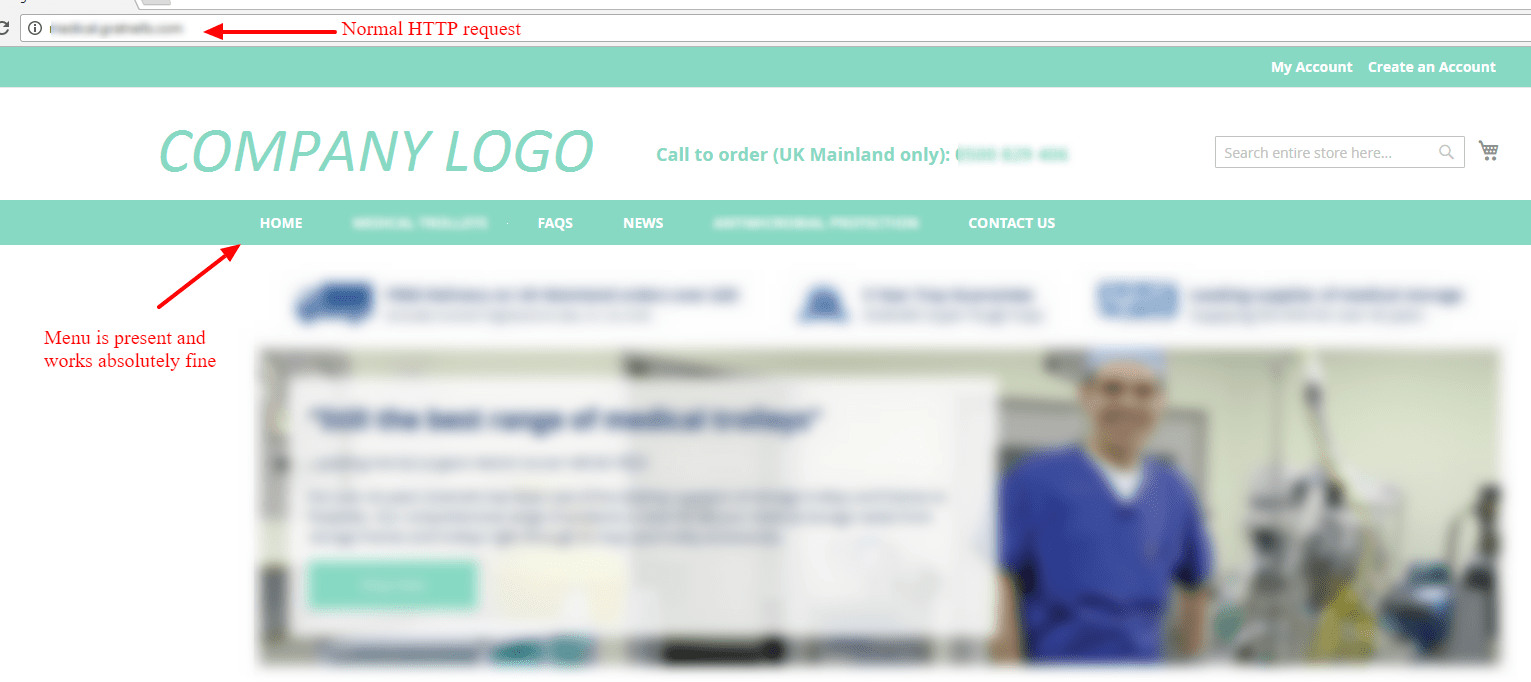
Store page displays normally with catalog navigation for both HTTP and HTTPS requests
Actual result
Store page displays the navigation menu with HTTP request only. It doesn’t work for HTTPS
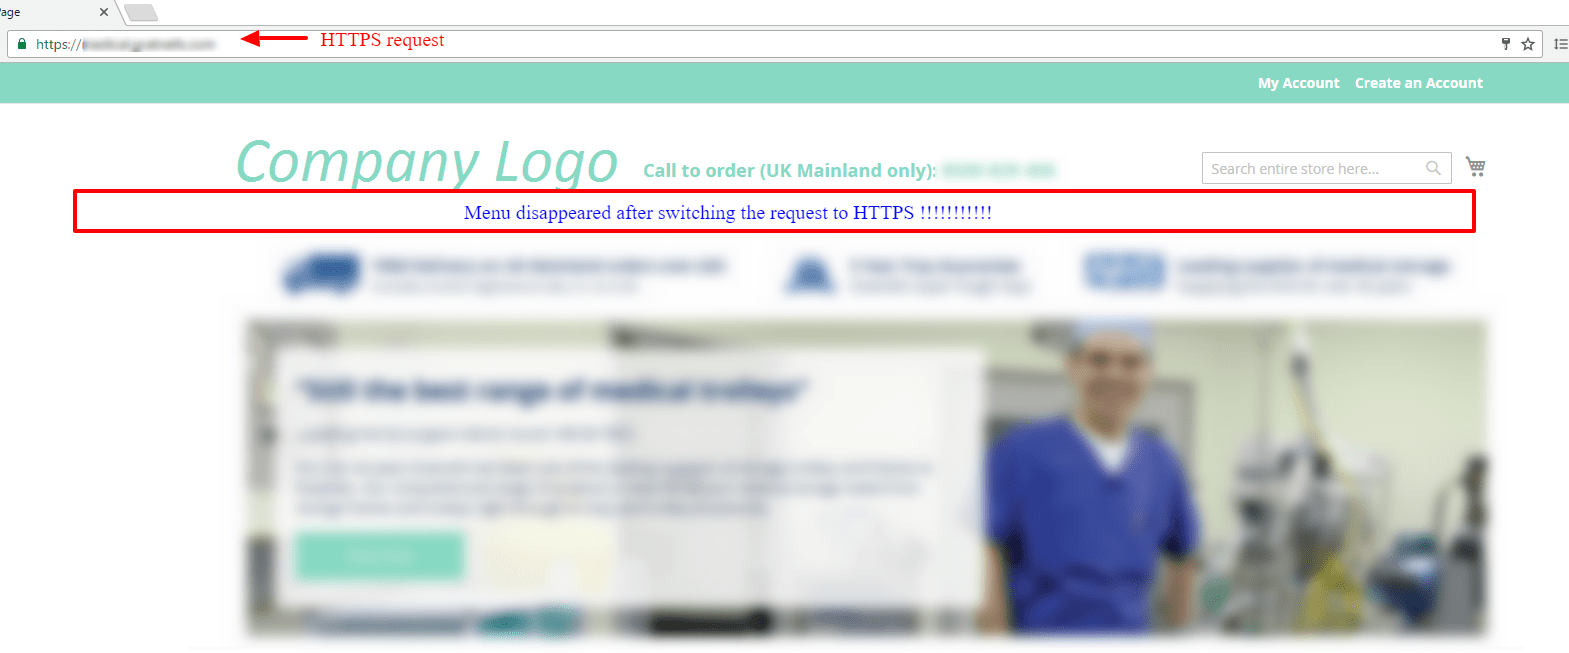
Solution:
Configure store URL and Varnish on HTTPS so all incoming requests are served securely. Make sure that you update your nginx configuration from fastcgi_param HTTPS $fastcgi_https; to fastcgi_param HTTPS “on”.
by Shoaib Rehman | Feb 14, 2017 | Windows
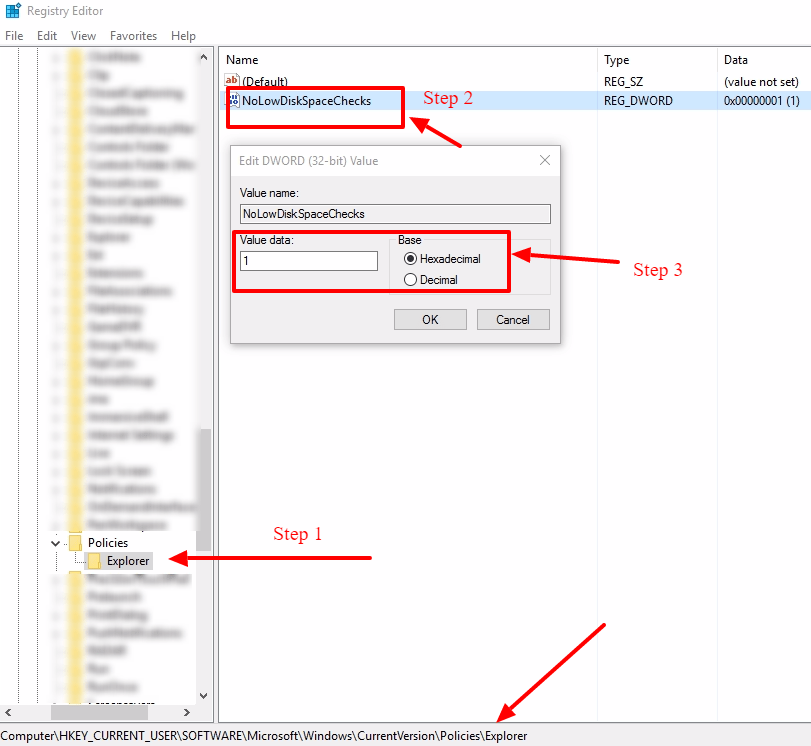
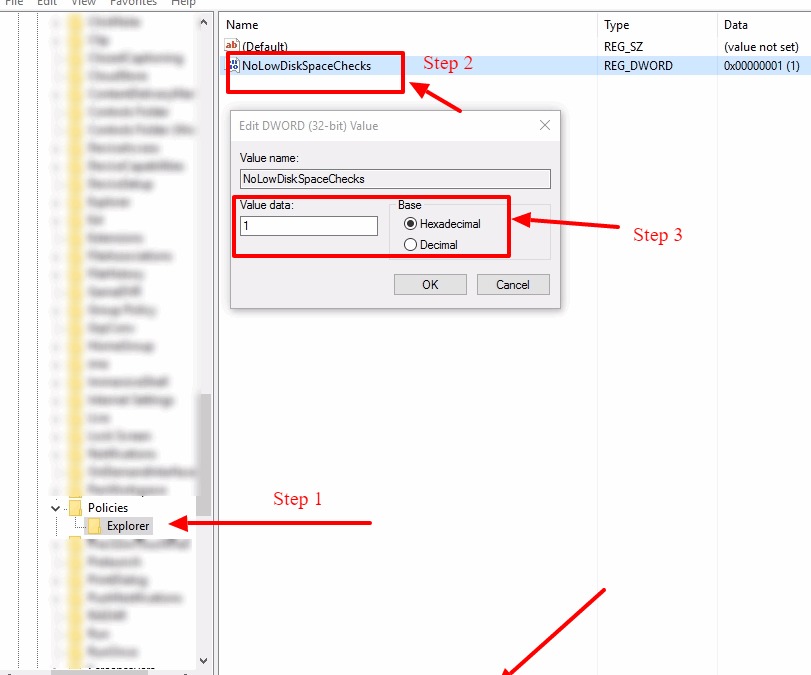
How To Disable Low Disk Space Checks In Windows
The steps below apply to Windows 10, Windows 8, Windows 7, Windows Vista, and Windows XP.
- Open Registry Editor.
- The steps for opening Registry Editor are a little different in some versions of Windows, so follow that link above if you need specific help.
- However, no matter which version of Windows you’re using, this command, when used from the Run dialog box (Windows Key + R) or Command Prompt, will open it right up
-
regedit
- Locate the HKEY_CURRENT_USER folder under Computer and click the expand sign (either (+) or (>) depending on your Windows version) to expand the folder.
- Continue to expand folders until you reach the HKEY_CURRENT_USER\Software\Microsoft\Windows\CurrentVersion registry key.
- Select the Policies key under CurrentVersion.
- From the Registry Editor menu, choose Edit, followed by New, followed finally by Key.
- Rename the new created New Key #1 to Explorer and Save(or Hit Enter).
- With the new key, Explorer, still selected, choose Edit, followed by New, followed finally by DWORD (32-bit) Value.
- After the DWORD is created beneath Explorer, it will initially be named New Value #1.
- Change the name of the DWORD to NoLowDiskSpaceChecks by typing it exactly as shown, and then hitting the Enter key.
- Right-click on the new NoLowDiskSpaceChecks DWORD you just created and choose Modify.
- In the Value data: field, replace the zero with the number 1.
- Click OK and close Registry Editor.
- Windows will no longer warn you about low disk space on any of your hard drives.
by Shoaib Rehman | Feb 8, 2017 | Magento 2

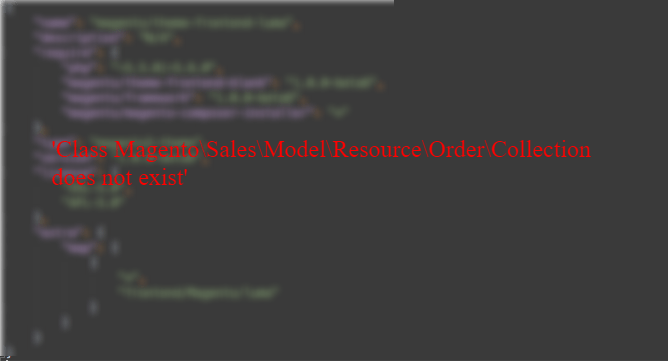
I recently upgraded my Magento installation from Magento 2.0 to Magento 2.1 and everything was fine until I ran ‘php magento setup:di:compile’ command after ‘php magento setup:upgrade’. I was instantly served with a big red error on my SSH tunnel.
After spending hours and hours on trying to fix the issue, I realized that the extension which I created to integrate ZENDESK Chat with Magento 2 contains an outdated Class name. Just so you know – In order to support PHP 7, where “Resource” is a reserved word, Resource namespace was renamed to ResourceModel long time ago. Therefore, it Resource cannot be used as a namespace anymore.
After I fixed the issue, my extension started to work fine and hopefully, you will be able to apply a quick fix by replacing all occurrences of Magento\Sales\Model\Resource\Order to Magento\Sales\Model\ResourceModel\Order
Please leave a comment and let me know if you are still not able to fix the error.
by Shoaib Rehman | Jan 16, 2017 | Magento 2
Magento2 is full of surprises and I am loving and hating it at the same time. I fix one issue and another issue comes up sooner or later.
Mostly, I have been using Ubuntu for Magento 2 development but I decided to try it on Windows to test the platform performance. Installation was nice and easy and I was able to install demo data without any issue.
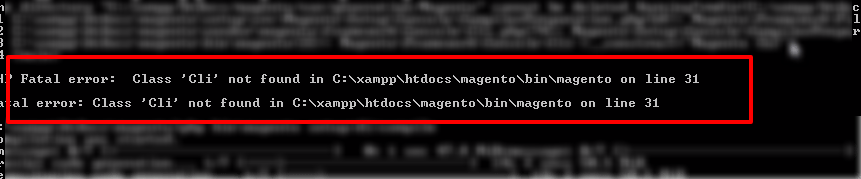
After setting up the initial version, I decided to create my own extension which involved a few frontend templating. Everything was normal until I ran ‘php bin\magento setup:di:compile’. Screenshot below.

I was served with a fatal error and after scratching my head a few times – and of course hitting on the wall a few times, I decided to remove var/generation directory. It all went fine this time. Alright, so to cut the long store short, do the following:
STEPS:
- Don’t panic
- Take a deep breath
- Remove {magento_directory}/var/generation/
- Run ‘php bin/magento setup:di:compile’ again
Did it fix your issue? Leave a comment below to let others know :)


