Magento 2 Repository and Factory are two different design patterns used in Magento 2 to manage the creation and retrieval of data objects.
A Repository is a pattern that defines a set of methods for working with data in a way that is abstracted from the underlying data source. In Magento 2, Repositories are typically used to manage the retrieval and storage of data in the database. They provide a consistent way to interact with data, allowing for the implementation of different data sources without affecting the rest of the code. Repositories can also be used to perform data validation and implement business logic.
A Factory is a pattern that provides a way to create objects. In Magento 2, Factories are typically used to create instances of a model or data object. They provide a centralized way to create objects and can be used to implement object creation logic. Factories can also be used to create objects that depend on other objects or data.
The main difference between Magento 2 Repository and Factory is their purpose. Repositories are used to manage the retrieval and storage of data, while Factories are used to create objects. Repositories can also be used to perform data validation and implement business logic, while Factories are typically used to implement object creation logic.
<?php

namespace Vendor\Module\Api;

interface ProductRepositoryInterface
{
    /**
     * Retrieve a product by id.
     *
     * @param int $productId
     * @return \Vendor\Module\Api\Data\ProductInterface
     * @throws \Magento\Framework\Exception\NoSuchEntityException
     */
    public function getById($productId);
}
<?php

namespace Vendor\Module\Model\Product;

class ProductFactory
{
    /**
     * Create new instance of a product.
     *
     * @return \Vendor\Module\Api\Data\ProductInterface
     */
    public function create()
    {
        return $this->_objectManager->create(\Vendor\Module\Api\Data\ProductInterface::class);
    }
}
In this example, the ProductRepositoryInterface is a Repository and is used to retrieve a product by id. The ProductFactory is a Factory and is used to create a new instance of a product.
In conclusion, Repositories are used to retrieve objects from a data source and apply business logic, while Factories are used to create new instances of objects. Both patterns are important in Magento 2, and the choice between a Repository and a Factory will depend on the specific requirements of the task at hand.
Magento 2 View Model is a type of Magento 2 UI Component that helps to bind data to a template in a flexible and reusable way. The purpose of the View Model is to help developers structure the presentation layer in a way that separates data processing and data presentation. This separation of concerns allows for easier maintenance, easier testing, and helps to avoid the duplication of code.
A View Model is a PHP class that implements the Magento\Framework\View\Element\Block\ArgumentInterface interface. This interface requires the class to define a public function called toArray() which returns an array of data that can be used in a template. The data returned by the toArray() method is passed to a template as a set of variables.
A View Model is created in the following steps:
Create a PHP class that implements the Magento\Framework\View\Element\Block\ArgumentInterface interface.
Define the toArray() method in the class.
Register the View Model in the XML layout.
Here is a code example of a View Model in Magento 2:
<?php

namespace Vendor\Module\ViewModel;

use Magento\Framework\View\Element\Block\ArgumentInterface;

class HelloWorld implements ArgumentInterface
{
    public function toArray()
    {
        return [
            'message' => 'Hello World!'
        ];
    }
}
In this example, we have created a View Model called HelloWorld that implements the Magento\Framework\View\Element\Block\ArgumentInterface interface. The toArray() method returns an array with a single key message and value Hello World!.
Next, we need to register the View Model in the XML layout. This is done by adding a viewModel tag to a block element in the XML layout:
In this example, we have added a viewModel argument to a block called hello_world with a class name of Vendor\Module\Block\HelloWorld. The viewModel argument is set to the Vendor\Module\ViewModel\HelloWorld class, which is the View Model we created earlier.
Finally, we can access the data in the View Model in a template using the following code:
In this example, we use the $block variable to access the hello_world block and call the getViewModel() method to get the View Model. The getMessage() method is then called on the View Model to get the message value.
The use of View Models in Magento 2 provides many benefits for developers. Firstly, it allows for separation of concerns between data processing and data presentation. This separation makes the code easier to maintain and test as the data processing logic can be tested independently of the presentation logic. Secondly, it helps to avoid duplication of code. For example, if you have a piece of data that is used in multiple templates, you can create a single View Model to separate layers.
In Magento 2, a factory method is a design pattern that can be used to create an instance of a class. The factory method pattern provides a way to create an object without specifying the exact class of object that will be created. This can be useful when the class to be instantiated is determined at runtime, rather than being hard-coded.
Here’s an example of a factory method for creating an instance of a Product class in Magento 2:
class ProductFactory
{
    /**
     * @var \Magento\Framework\ObjectManagerInterface
     */
    protected $_objectManager;

    /**
     * @param \Magento\Framework\ObjectManagerInterface $objectManager
     */
    public function __construct(\Magento\Framework\ObjectManagerInterface $objectManager)
    {
        $this->_objectManager = $objectManager;
    }

    /**
     * Create new product
     *
     * @param array $data
     * @return \Magento\Catalog\Model\Product
     */
    public function create(array $data = [])
    {
        return $this->_objectManager->create('Magento\Catalog\Model\Product', $data);
    }
}
In this example, the ProductFactory class has a single method, create(), which creates and returns a new instance of the \Magento\Catalog\Model\Product class. The method takes an optional array of data that can be used to set properties on the new product instance.
It uses ObjectManager which abstracts the actual class instantiation and makes it more flexible to be able to create different types of the same class.
The factory can be used in the following way:
$productFactory = new ProductFactory($objectManager);
$product = $productFactory->create(['sku' => 'test_sku']);
By using the factory method, you can create new instances of the Product class without needing to know the specifics of how the class is implemented. This can make your code more flexible and easier to maintain.
To make an HTTP request in Magento 2, you can use the following steps:
First, you need to inject the HTTP client class into your class using dependency injection. You can do this by adding the following line of code in your class constructor:
public function __construct(
    \Magento\Framework\HTTP\Client\Curl $curl
) {
    $this->curl = $curl;
}
Now you can use the $this->curl object to make an HTTP request. You can set the request method, headers, and body using the following methods:
// Set the request method
$this->curl->setOption(CURLOPT_CUSTOMREQUEST, 'POST');

// Set the request headers
$this->curl->setHeaders(['Content-Type: application/json']);

// Set the request body
$this->curl->setBody(json_encode($requestBody));
Finally, you can send the request and get the response using the following code:
// Send the request
$this->curl->get($url);

// Get the response status code
$statusCode = $this->curl->getStatus();

// Get the response body
$responseBody = $this->curl->getBody();
That’s it! You have now made an HTTP request in Magento 2 using the Curl client class.
PHPUnit is an automated testing framework for PHP and Magento 2 supports it out of the box with PHPUnit. As a good software engineer, one must consider writing their code by following the Test Driven Development a.k.a. TDD approach so in this quick tutorial, I will briefly explain the idea of PHP Unit Testing and why is important to follow TDD.
What is Unit Testing?
Unit Testing simply refers to testing every individual component/unit of a software. The objective is to ensure and validate that each unit of the software you are writing performs as designed. A unit is the smallest testable part of your application that usually accepts one or a few inputs and mostly a single output. One of the benefits of Unit testing is that this process is fully automated and does not require man hours to review and test the code.
Why Unit Test?
There are several benefits of Unit Testing but the key three benefits are as follow:
Early problem detection
Have you just created a beautiful software but one or more sections do not work in production? If yes then welcome to Unit Testing using which we can find the problems early in the development cycle.
Facilitates Change
Is there a new version of the programming language available and the version in which you wrote your software been deprecated? No problem – Unit testing allows you to refactor code or upgrade system libraries at a later date, and make sure the module still works correctly. The idea of unit testing is to write test cases for all functions so if a change causes a fault, it can be quickly identified.
Design
Ok I am not talking about your website frontend design or the flashy colours here. I’m instead referring to Design Patterns of your software. Unit Tests are to be written prior to the implementation of the actual code, and this approach helps a developer to think through the design and the end goal before the development begins.
Enough of the theory .. now let’s move on and create a simple Unit Test for your Bespoke Magento Module.
Write a unit test in Magento 2
Let’s assume that you have created a simple Magento 2 module called Shoman_MyFirstModule; that has its configuration area in Store > Configuration (say Shoman > My First Module), and in the configuration area you have a dropdown with Yes/No value.
Your module has a Helper Class called Data.php with a method called isEnabled(). The content of the file is as follows:
As you can see in the code above, we have simple function that pulls and returns the value of the custom configuration.
Next, we are going to create a Unit Test for this Helper Class.
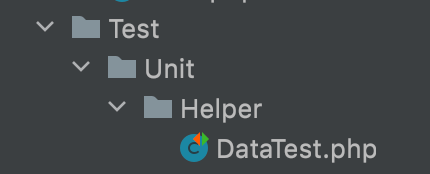
In your custom module root, create a new directory Test/Unit/Helper; and since your Helper class is called Data.php so create a new file called DataTest.php in the path app/code/Shoman/MyFirstModule/Test/Unit/Helper. Your directory structure will look like the one in the image below:
Unit Test Path
DataTest.php will extend \PHPUnit\Framework\TestCase and have two functions:
setUp() – treat it as a __construct() function
testIsEnabled() – isEnabled() is the original function in the Data.php class. We have prefixed the original function name with test so we can run a Unit Test on it.
I am a Magento certified expert with a 100% success rate on UpWork (View Profile) and more than 2000 hrs.
I am an eCommerce Enthusiast and started using Magento back in 2014. I specialise in creating custom and bespoke modules for Magento including but not limited to third party integrations and bespoke business requirements.